Organic gardening tips for beginners: Start your organic gardening journey with proven strategies that work. Whether you’re growing vegetables on a small balcony or in a spacious backyard, organic gardening delivers fresh, healthy produce while building soil fertility naturally. This comprehensive guide covers everything beginners need to know about growing food organically—from preparing soil and planting techniques to managing pests naturally and harvesting at peak freshness. By following these evidence-based practices, you’ll develop a thriving garden that requires minimal chemical inputs while producing nutritious vegetables for your family.
Understanding Organic Gardening Basics for Success
Organic gardening represents a complete gardening philosophy that works with nature rather than against it. The foundation of organic gardening rests on three essential principles: building healthy soil, avoiding synthetic chemicals, and fostering beneficial ecosystems within your garden space. Unlike conventional gardening, which relies on chemical fertilizers and pesticides, organic methods emphasize natural processes to create sustainable, productive growing environments that improve over time.
The core difference between organic and conventional gardening lies in how nutrients reach your plants. Chemical fertilizers provide quick nutrient boosts but can degrade soil structure and harm beneficial microorganisms. Organic fertilizers, derived from plant-based materials like compost, manure, bone meal, and seaweed extracts, release nutrients gradually and promote long-term soil health. This slow-release approach ensures plants receive steady nourishment while building living soil that becomes increasingly fertile with each growing season.
Starting small is crucial for beginner success. Many first-time gardeners make the mistake of planting too large an area, leading to overwhelmed schedules, untended weeds, and failed plants. A manageable garden of 50-100 square feet provides ample growing space for beginners while remaining maintainable alongside life’s other commitments. This size allows you to practice essential gardening skills, learn from experience, and expand gradually as confidence builds.

Preparing Your Soil: The Foundation of Organic Gardening
Healthy soil forms the bedrock of successful organic gardening—everything you see growing above ground reflects what’s happening beneath the surface. The most important step in organic gardening is prioritizing soil health before planting anything. Native soils rarely contain sufficient nutrients and organic matter to support vigorous plant growth, which makes soil amendment absolutely essential for beginners.
Building soil structure requires adding organic matter to existing soil, which improves texture, drainage, aeration, and water-holding capacity. The three core components of soil amendment include compost, aged manure, and fallen leaves mixed together. For every percentage point of organic matter added to the top six inches of medium-textured soil, approximately 10-20 pounds of nitrogen, 1-2 pounds of phosphorus, and 0.4-0.8 pounds of sulfur become available annually for plant use.
Incorporating 2-4 inches of quality compost into the top few inches of your garden soil dramatically improves growing conditions. If you’re using raised beds, fill them with a 50-50 blend of garden soil and finished compost for optimal results. For container gardening, use lightweight, well-draining potting soil specifically formulated for vegetables rather than heavy garden soil, which compacts quickly and suffocates roots.
Understanding soil drainage is equally important as nutrient content. Well-drained soil allows water to reach roots while preventing waterlogging that causes root rot and fungal diseases. Natural inorganic materials like perlite, sand, and vermiculite can be added to improve drainage in dense clay soils. Mulching the soil surface with 2-4 inches of straw or shredded leaves (not bark mulch, which breaks down too slowly) helps retain moisture, suppress weeds, regulate soil temperature, and gradually decompose into additional organic matter.
The Complete Composting System for Organic Gardeners
Creating your own compost transforms kitchen scraps and yard waste into the most valuable amendment in organic gardening. Homemade compost provides essential nutrients, supports soil microbes and beneficial organisms, improves soil aeration, and is completely free—making it the perfect fertilizer for organic growers. Understanding how to layer materials properly and manage your compost pile ensures faster decomposition and better results.
The recipe for successful composting requires balanced “greens” and “browns” by volume. Greens include nitrogen-rich materials like fruit and vegetable kitchen scraps, fresh grass clippings, egg shells, coffee grounds, and tea leaves. Browns include carbon-rich materials like dried leaves, sticks, twigs, straw, shredded newspaper, and cardboard boxes. Mix these materials in roughly equal proportions to create the ideal carbon-to-nitrogen balance for decomposition.
Setting up your compost bin requires these essential steps:
- Place a layer of woody stems or twigs at the bottom to improve air circulation and drainage
- Add alternating layers of browns and greens, each about 4-6 inches thick
- Cover the compost material with a tarp to retain heat and moisture while preventing weed seeds from germinating
- Add water with each layer until the mixture resembles a wrung-out sponge (moist but not waterlogged)
- Mix the pile regularly every few weeks to accelerate decomposition
Cool composting systems simply involve adding materials gradually as you generate them, allowing the pile to decompose over 6-12 months without active management. Hot composting systems, which require more effort but faster results, involve gathering enough material to fill your bin completely, mixing the materials thoroughly several times, and achieving finished compost in 6-8 weeks. Compost is ready for garden use when it’s dark brown and smells earthy.
Always avoid composting meat, dairy products, diseased plant material, and pernicious weeds like quack grass that may survive the composting process.

Choosing the Right Growing Setup for Your Space
Beginners have three main options for growing vegetables: in-ground gardens, raised beds, or containers. Each approach works for different situations and space constraints. Your choice depends on available space, soil quality, physical ability, and available maintenance time.
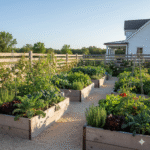
In-ground gardens work well if you have quality native soil and adequate space to prepare beds properly. However, this approach requires significant soil testing and amendment before planting. Raised beds provide numerous advantages for beginners: you bypass poor native soil entirely, can fill beds with quality potting soil immediately, enjoy better drainage and temperature control, require less bending, and make gardening more accessible. A 4×8 foot raised bed provides ample growing space while remaining manageable.
Container gardening offers maximum flexibility for renters, those with limited space, and balcony gardeners. Choose containers at least 15-30 centimeters (6-12 inches) across and equally deep—larger containers retain moisture better and support healthier root systems. Fill containers with quality potting soil formulated specifically for containers, which drains properly while retaining necessary moisture.
Location selection determines gardening success more than most beginning gardeners realize. Most vegetables need at least 6-8 hours of direct sunlight daily for vigorous growth, flowering, and fruit production. Leafy greens tolerate partial shade (4-6 hours), but fruiting plants like tomatoes, peppers, and cucumbers demand full sun. Choose a location near a convenient water supply to eliminate the temptation to skip watering during busy periods.
Mastering Watering Techniques and Schedules
Watering represents the most common mistake beginner organic gardeners make, typically erring on the side of overwatering rather than underwatering. Excess moisture suffocates roots, encourages fungal diseases, causes root rot, and kills more plants than drought in home gardens. The key to successful watering involves understanding your plants’ actual water needs rather than watering on a fixed schedule.
Check soil moisture before watering by pressing your finger into the soil to a depth of one inch—if soil feels moist at this depth, plants don’t need water yet. Most vegetables need water when the top inch of soil becomes dry. Young seedlings and plants in containers require more frequent watering since they dry out rapidly, especially in hot weather, while established plants in in-ground gardens tolerate more variability.
- Water early in the morning to give plants maximum time to dry before evening, reducing disease pressure
- Water at soil level directly at plant roots rather than spraying foliage, which promotes fungal diseases
- Use a gentle spray to imitate natural rainfall rather than harsh, high-pressure streams that damage seedlings
- Avoid watering during hot midday hours when water evaporates before reaching roots
- Adjust frequency based on rainfall, temperature, and visible plant condition—wilting leaves indicate immediate watering needs
For raised beds and containers, aim for moist soil to a depth of 6-8 inches. In-ground beds require watering when the top inch of soil becomes dry, which typically means once or twice weekly during normal summer conditions. Check soil frequently during the first month after planting while plants establish root systems.
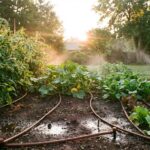
Drip irrigation and soaker hoses deliver water efficiently directly to soil while minimizing water waste and disease pressure compared to overhead sprinkling. Even simple hand-watering at soil level with proper technique produces excellent results for beginning gardeners.
Starting Seeds Indoors: Timing and Techniques
Beginning gardeners often wonder whether to start seeds indoors or purchase transplants from nurseries. Buying transplants costs more but eliminates complexity, making it the recommended approach for first-year gardeners. However, starting seeds indoors allows you to grow plant varieties unavailable locally and costs significantly less per plant.
Seeds requiring indoor starting before transplanting include tomatoes, peppers, eggplant, broccoli, cabbage, and cauliflower. These plants need 6-10 weeks of indoor growing before outdoor planting to reach sufficient size for transplanting. Starting seeds requires strong artificial light—windowsill light is insufficient and produces weak, leggy plants prone to disease and failure.
Proper indoor seed-starting setup includes:
- T5 fluorescent grow lights positioned 2-4 inches above seedling foliage
- 16 hours of light daily and 8 hours of darkness for strong, compact growth
- Seed-starting mix formulated specifically for seeds (finer than regular potting soil)
- Heat mats that maintain soil temperature at 65-75°F (18-24°C) for reliable germination
- Power-strip timer controlling lights and heat mats automatically
Seedlings develop strong root systems when light remains close and intense—this prevents the stretching and weakness that plagues window-started seeds. Water seedlings carefully to keep soil moist but never waterlogged. Once seedlings develop their first true leaves (the second set appearing), begin dilute fertilizer applications weekly to support growth in nutrient-poor seed-starting mix.
Harden off seedlings gradually before transplanting by exposing them to outdoor conditions incrementally over 7-10 days—moving them to shade initially, then gradually increasing light exposure and outdoor time. This process toughens plants, reducing transplant shock and ensuring successful establishment in the garden.
Choosing Beginner-Friendly Vegetables and Herbs
Success builds confidence, which motivates continued gardening efforts. Choose vegetables and herbs known for reliable performance with minimal care rather than challenging varieties. Beginner-friendly vegetables include:
- Tomatoes (determinate varieties in containers, indeterminate in ground)
- Lettuce and leafy greens (extremely forgiving, grow quickly)
- Radishes (germinate reliably, mature in 30 days)
- Zucchini and summer squash (prolific, require minimal care)
- Beans (nitrogen-fixing, produce abundantly)
- Carrots (deeply satisfying to harvest)
- Peppers (require patience but reward dramatically)
The seven easiest herbs for beginners require only basic care and provide continuous harvests:
- Chives: the absolute easiest herb—forgiving, playful with any plant, and thrives in various conditions
- Mint: hardy, spreading aggressively, perfect for container growth
- Oregano: extremely resilient, semi-evergreen, produces continuously
- Sage: strong-flavored, drought-tolerant once established
- Thyme: low-growing, attractive, repels pests naturally
- Parsley: dual-purpose leaf and root production
- Lemon Balm: lemony flavor, prolific spreading
Herbs require minimal care once established. Plant them in containers at least 30 centimeters (12 inches) across and equally deep, provide at least 4 hours of sunlight daily, ensure good drainage, and water when the top inch of soil becomes dry.
Companion Planting: Nature’s Pest Management Strategy
Companion planting involves growing specific plants together to enhance crop production, repel damaging pests, improve soil health, and maximize garden space. This ancient strategy maximizes garden efficiency by planting tall plants to shade smaller ones, vining plants to suppress weeds, and flowering plants to attract beneficial insects.
Strategic companion planting combinations:
- Tomatoes with basil, marigolds, and carrots: basil repels flies and mosquitoes while improving flavor; marigolds deter nematodes; carrots improve growth
- Beans with corn: corn provides natural support for climbing beans; beans fix nitrogen in soil for corn
- Cucumbers with radishes and peas: radishes repel beetles; peas fix nitrogen
- Cabbage with dill and onions: dill attracts beneficial wasps; onions repel pests
- Carrots with onions and peas: peas add nitrogen; onions repel carrot flies
The famous “Three Sisters” combination of corn, beans, and squash represents companion planting at its finest. Corn provides vertical support for climbing beans, which fix nitrogen in soil for all three crops. Squash leaves shade the soil to suppress weeds, conserve moisture, and protect smaller bean and pea plants from intense sun.
Herbs that deter pests through strong aromas include:
- Alliums (onions, garlic, chives): repel most insects
- Mint varieties: repel beetles, ants, flies, and mealybugs
- Basil, oregano, rosemary: keep mosquitoes, flies, and aphids away
- Lavender: repels fleas and mosquitoes
- Nasturtiums: attract beneficial pollinators
- Marigolds: deter Mexican bean beetles and nematodes

Managing Pests Naturally: Organic Solutions That Work
Pest management in organic gardening focuses on preventing problems through healthy plants and beneficial insects rather than chemical elimination. A healthy, well-fed plant in quality soil resists pests far better than stressed, underfed plants in poor soil. Companion planting, beneficial insects, and homemade sprays address most pest problems organically.
Natural pest control methods include:
Encourage beneficial insects by planting nectar and pollen-producing plants like fennel, dill, cosmos, sunflowers, and yarrow. These attract ladybugs, parasitic wasps, and lacewings—natural predators that consume harmful insects. Create beneficial insect habitats by maintaining mulched areas and allowing leaf litter to accumulate in garden corners.
Physical barriers and removal:
- Hand-pick larger pests like Japanese beetles and squash bugs into soapy water
- Use row covers over young plants to prevent insect access
- Spray plants with water to dislodge aphids and mites
- Cut off affected plant areas and discard diseased material
- Soap spray: mix 2.5 tablespoons liquid dish soap with 1 gallon distilled water; spray plants thoroughly weekly
- Garlic spray: mince 4 garlic cloves, soak in mineral oil overnight, strain, and dilute in water; effective against soft-bodied insects
- Neem oil spray: mix 1-2 teaspoons pure neem oil with one liter water and one teaspoon liquid soap; kills pests by suffocation
- Vinegar spray: mix one part white or apple cider vinegar with three parts water plus one teaspoon dish soap; effective against multiple pests
- Chili-garlic extract: blend chilies and garlic, boil in water, cool overnight, strain, and spray; excellent for aphids and mites
Always perform a patch test on a few plant leaves before full application and spray during evening hours to prevent sun-caused leaf damage.
Fertilizing Your Organic Garden Naturally
While compost provides the foundation of soil fertility, regular feeding throughout the growing season supports abundant vegetable production. Organic fertilizers release nutrients gradually, building soil fertility season after season while avoiding the rapid nutrient depletion caused by chemical fertilizers.
Liquid organic fertilizers accelerate nutrient availability when plants need visible nutrient boosts. Seaweed extract and ocean water-based fertilizers provide broad-spectrum nutrients beyond just nitrogen-phosphorus-potassium. Apply liquid fertilizers approximately every month during the growing season by spraying on soil or diluting with water.
Solid organic fertilizers include:
- Aged animal manure (composted for 6-12 months)
- Bone meal (high in phosphorus for root and flower development)
- Fish emulsion (balanced nitrogen-phosphorus-potassium)
- Worm castings (nutrient-rich, beneficial microbes)
- Compost tea (brewed compost extract)
Fertilizers are labeled with NPK ratios (nitrogen-phosphorus-potassium)—a balanced 10-10-10 ratio supports general plant growth, while higher phosphorus supports root crops, and higher nitrogen supports leafy greens. Read labels carefully to match fertilizer composition to plant needs at different growth stages.
Essential Tools and Supplies for Beginning Gardeners
Quality tools make gardening significantly easier and more enjoyable. Invest in good-quality implements rather than cheap alternatives that wear quickly and frustrate users. Must-have tools for beginning gardeners include:
- Shovel: essential for turning soil and digging deep holes
- Garden fork: breaks up compacted soil with less effort than shovels
- Hoe: disturbs shallow weeds and creates planting trenches
- Rake: smooths soil surface and gathers debris
- Trowel: plants seedlings and handles small digging tasks
- Hand weeding tool: extracts deep-rooted weeds efficiently
- Quality pruning shears: harvests vegetables and removes diseased growth
- Watering system: hose with spray attachment, soaker hose, or drip irrigation setup
- 5-gallon buckets: mixing soil amendments, carrying compost, harvesting vegetables
- Wheelbarrow: transports heavy materials efficiently
- Work gloves: protects hands during digging and handling
Shop used tools at estate sales, yard sales, and recycled goods stores to reduce costs while acquiring quality implements.
Seasonal Planting Guide and Crop Rotation Strategies
Understanding what grows well in each season for your climate zone dramatically improves success rates. Before planting, research your last spring frost date and first fall frost date—these determine your growing season length and guide planting timing. Cool-season crops like lettuce, broccoli, and spinach tolerate frost and thrive in spring and fall. Warm-season crops like tomatoes, peppers, and cucumbers require soil temperatures above 60°F and cannot tolerate frost.
Crop rotation represents an essential organic gardening practice that becomes increasingly important in year two and beyond. Different plants have different nutrient demands, and repeating the same crop in the same location depletes specific nutrients, creating deficiency patterns and encouraging pest and disease buildup. Develop a simple three-year rotation: plant heavy feeders (tomatoes, corn) first, root crops (carrots, potatoes) second, and nitrogen-fixing legumes (beans, peas) third.
Cover crops planted during fall and winter rest periods build soil fertility, suppress weeds, prevent erosion, and reduce pest pressure naturally. Legume cover crops like clover and alfalfa fix atmospheric nitrogen directly into soil, providing free fertilizer for future seasons. Simply plant cover crop seeds after harvesting fall crops, allow them to grow through winter, and dig them into soil in early spring before planting warm-season vegetables.
Common Beginner Mistakes to Avoid
Learning from others’ mistakes accelerates your gardening success. The most frequent beginning gardener errors include:
Overwatering or wrong watering practices: Check soil moisture before watering. Most plants need water when the top inch becomes dry. Avoid daily watering routines that lead to waterlogged soil and root rot.
Insufficient sunlight: Vegetables need 6-8 hours minimum direct sunlight daily. Don’t plant in shade expecting success—weak harvests and leggy plants result.
Poor soil preparation: Skimping on compost and organic matter creates poor growing conditions that undermine even perfect watering and sunlight. Invest time and resources in soil building before planting.
Planting too close together: Crowded plants develop disease problems, produce smaller yields, and create unhealthy competition. Follow seed packet spacing guidance based on mature plant size.
Neglecting crop rotation: Repeating crops year after year depletes nutrients and concentrates pests and diseases. Rotate plant families annually.
Starting seeds indoors without sufficient light: Windowsill light creates weak, leggy seedlings prone to disease. Invest in grow lights for reliable indoor seed starting.
Ignoring soil health: Everything depends on soil. Always prioritize soil fertility through compost and organic matter amendments.
Harvesting at Peak Freshness: Timing and Techniques
Harvesting vegetables at the right maturity stage ensures optimal flavor, nutrition, and plant production. Picking frequently encourages continued flowering and fruit production in plants like tomatoes, zucchini, and beans. Always harvest in early morning when vegetables contain maximum moisture and flavor.
Harvest guidelines for common vegetables:
- Tomatoes: pick when fully colored but still slightly soft to the touch
- Zucchini: harvest when 6-8 inches long for tender texture; larger fruit becomes tough
- Lettuce and greens: pick outer leaves first, allowing inner leaves to continue growing
- Peppers: harvest green for lower yield, or wait for full color (red, yellow, orange) for sweeter peppers
- Beans: pick pods when full-sized but still tender, before beans swell inside
- Radishes: pull when 1 inch in diameter for crispy texture
- Carrots: harvest when shoulders reach ½ inch diameter, or leave for larger root development
Frequently Asked Questions About Organic Gardening Tips for Beginners
What’s the minimum space needed to start an organic garden?
Even 50 square feet produces significant food for a small family. Container gardening on balconies works equally well. Start small and expand as confidence and experience grow.
Can I garden organically in containers on my apartment balcony?
Yes, absolutely. Choose containers at least 30 centimeters (12 inches) across and deep, fill with quality potting soil, and grow leafy greens, herbs, peppers, tomatoes, and beans successfully in containers.
How long does homemade compost take to be ready?
Cool composting takes 6-12 months with minimal management. Hot composting produces finished compost in 6-8 weeks with active management and regular mixing.
Do I really need grow lights for starting seeds indoors?
Yes, for best results. Windowsill light alone produces weak, leggy seedlings prone to disease and failure. T5 fluorescent grow lights positioned 2-4 inches above seedlings ensure strong growth.
What’s the difference between organic and conventional gardening?
Organic gardening avoids synthetic chemicals, builds soil health through composting and organic matter, and supports beneficial ecosystems. Conventional gardening relies on chemical fertilizers and pesticides for quick results that don’t build long-term soil fertility.
How much watering do vegetables actually need?
Most vegetables need consistent soil moisture but not waterlogged conditions. Check soil to one-inch depth—if moist, don’t water. If dry, water deeply until water drains from containers or penetrates 6-8 inches in-ground. Usually this means once to twice weekly during normal summer conditions.
Can I use kitchen waste in my compost?
Yes, most kitchen waste including fruit and vegetable scraps, eggshells, coffee grounds, and tea bags. Avoid meat, dairy, oils, and grains that attract pests or create odor problems.
Conclusion: Organic Gardening Tips for Beginners
Organic Gardening Tips for Beginners —watching seeds germinate, plants grow, flowers bloom, and vegetables mature delivers unique satisfaction impossible to replicate through shopping. Starting small with manageable gardens focused on soil health, careful watering, and natural pest management ensures success while preventing the overwhelm that derails many beginning gardeners.
The organic gardening journey teaches valuable lessons about patience, observation, and working with natural systems rather than against them. Every gardener kills plants, makes mistakes, and learns from experience—these failures represent progress, not setbacks. By prioritizing healthy soil, choosing beginner-friendly vegetables, and following evidence-based practices covered in this guide, you’ll develop a thriving garden that produces fresh, nutritious food while building valuable skills and deeper connection with nature.
Begin today with one small raised bed or a few containers. Add quality compost, choose one or two favorite vegetables, water carefully, and observe what grows. Your organic garden awaits, ready to nourish both body and soul with every harvest.
Asif Ali is a gardening blogger with over 2 years of experience writing about garden inspiration, eco-friendly gardening, and beautiful garden destinations. He focuses on practical, sustainable ideas that help beginners create inspiring gardens with ease.