Growing your own food doesn’t require a degree in agriculture or access to expensive chemicals. Whether you’re dreaming of homegrown tomatoes, fresh herbs for your kitchen, or a thriving vegetable patch in your backyard, organic gardening tips for beginners usa can transform your space into a productive garden that nourishes both your body and the environment. This comprehensive guide walks you through everything you need to know to start your first organic garden—no chemicals, no complicated techniques, just practical wisdom to help you succeed.
Understanding Organic Gardening Basics
Organic gardening is a holistic approach to growing plants that rejects synthetic pesticides, fertilizers, and genetically modified seeds. Instead, it works with nature to create a balanced ecosystem where your plants can thrive. The philosophy is simple: feed the soil, not the plant. When your soil is healthy and alive with beneficial microorganisms, your plants naturally become stronger, more resilient, and less susceptible to pests and diseases.
Many beginners worry that skipping chemicals means they’ll need special knowledge or expensive equipment. That’s not true. In fact, organic gardening often becomes easier over time because you’re building healthy soil that practically takes care of itself. The first season might require more attention, but by year two and three, your garden will become increasingly self-sufficient. You’ll spend less money on inputs and more time simply enjoying the fruits of your labor.

Step One: Choose Your Garden Location Wisely
Before you buy a single seed, spend time observing your property. The right location is non-negotiable—no amount of skill can overcome poor sunlight or difficult water access. Walk around your yard at different times of day and note which areas receive direct sunlight.
Sunlight is your first priority. Most vegetables need at least 6 to 8 hours of direct sunlight daily, with morning sun being especially valuable. Morning light helps dry dew and reduces fungal disease. If you’re growing leafy greens or herbs, partial shade (4-6 hours) might work, but fruiting crops like tomatoes and peppers really need that full sun.
Water access matters enormously. If your garden is far from a water source, you’ll be less likely to water consistently. Young plants especially need regular moisture, and morning watering becomes inconvenient when you have to haul water across the yard. Ideally, your garden location should have convenient access to a hose or spigot.
Drainage is your third consideration. Standing water is the enemy of organic gardens. If your chosen spot puddles after rain, you’ll struggle with root rot and fungal issues. Raised beds solve this problem beautifully by elevating your soil above poorly draining ground.
Step Two: Build Healthy Soil from the Ground Up
Here’s a truth that separates successful gardeners from frustrated ones: healthy soil is everything. You can invest in fancy tools and rare seeds, but without quality soil, you’ll struggle. The good news? Building soil is straightforward and actually saves money long-term.
Start with a soil test. Your local agricultural extension office (usually connected to a university) can test your soil for pH, nutrient levels, and potential contaminants. The test costs $15-30 and provides invaluable information. Most vegetables thrive in soil with a pH between 6.0 and 7.0 (slightly acidic to neutral). This simple test prevents months of frustration.
Amend your soil with organic matter. Organic matter is the foundation of healthy soil. It improves drainage, increases water retention, feeds beneficial microorganisms, and provides nutrients to your plants. Add compost, aged manure, shredded leaves, or grass clippings. Mix 2-4 inches of organic matter into the top 6-9 inches of your existing soil, or for raised beds, fill completely with a mixture of about 60% topsoil and 40% compost.
Create your own compost. Making compost is one of the best investments a beginning gardener can make. You’re essentially creating plant food from kitchen scraps and yard waste—for free. Layer brown materials (dry leaves, straw, shredded paper) and green materials (grass clippings, vegetable scraps, fresh plant debris) in a ratio of about 3 parts brown to 1 part green. Water the pile regularly, turn it occasionally if you want faster results, and in 3-6 months you’ll have dark, crumbly, nutrient-rich compost. Even a simple pile in a corner works; you don’t need a fancy bin.

Step Three: Start Small and Choose Easy Plants
Ambition is wonderful, but the most common beginner mistake is planting too much too soon. A single 4×4-foot raised bed or a collection of containers can yield surprising amounts of food while remaining manageable.
Easy vegetables for first-time growers include: cherry tomatoes (especially indeterminate varieties that keep producing all season), lettuce and leafy greens that mature in 3-4 weeks, radishes which are ready to harvest in just 25 days, bush beans that are nearly foolproof, zucchini that produces abundantly with minimal care, and spinach which grows quickly even in partial shade.
Beginner-friendly herbs include: basil which thrives in warm weather and loves being harvested, parsley that’s hard to kill, chives which are nearly indestructible perennials, thyme and oregano which are Mediterranean natives requiring minimal fuss, and mint (which you might want to grow in containers to prevent it from taking over).
Avoid large sprawling plants like pumpkins and winter squash when starting—they take enormous space and can overwhelm a beginner’s garden. Similarly, disease-prone crops like potatoes are better left for year two or three when you’ve gained experience.
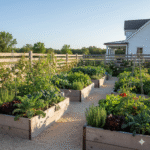
Step Four: Prepare Your Beds or Containers
You have three main options for growing: in-ground gardens, raised beds, or containers. Each has advantages depending on your space and soil conditions.
Raised beds are the favorite choice for beginners because they give you control over soil quality, drain well, and are easier on your back. A 4×4-foot bed is a manageable starting size, and you can expand next season. Fill with a blend of quality topsoil and compost, not with plastic bottles or logs (which defeat the purpose of giving roots plenty of space).
Container gardening works beautifully if you have limited space. Use pots at least 12 inches across and deep for herbs and leafy greens, and larger (18-24 inches) for tomatoes and peppers. Make sure containers have drainage holes. Use potting mix specifically formulated for containers, not garden soil, which compacts in pots.
In-ground gardens work fine if you have decent existing soil, but you’ll need to amend heavily with compost. If starting an in-ground garden, consider sheet composting: lay cardboard or newspaper over the existing grass, top with 8 inches of compost and aged manure, and plant directly into it the following spring.
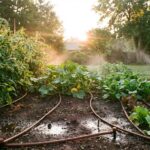
Step Five: Master the Art of Watering
Poor watering is where most beginning gardeners struggle. The solution seems simple until you realize timing, depth, and frequency all matter.
Water deeply and less frequently. Shallow sprinkling encourages shallow roots, which dry out quickly. Instead, water thoroughly so moisture reaches 6-8 inches deep. This encourages plants to develop strong root systems. Most established plants need about 1 inch of water per week (measure with a rain gauge if possible), but this varies by weather, soil type, and plant stage.
Water in early morning. Morning watering allows plants to absorb moisture before the hot midday sun, and any water on foliage dries quickly, reducing fungal disease. Never water at midday—it’s wasteful because most evaporates. Evening watering leaves foliage wet overnight, inviting mildew and disease.
Water the soil, not the leaves. Aim your water at the soil around the plant’s base using a soaker hose or drip irrigation. Wet foliage spreads disease and wastes water. If you must hand-water with a hose, use a gentle spray and keep it at soil level.
Check soil moisture before watering. Stick your finger 2 inches into the soil. If it feels moist, wait. If it’s dusty and dry, water deeply. This simple habit prevents the overwatering that kills more plants than drought.
Step Six: Build Soil Continuously Throughout the Season
Your soil work doesn’t end after initial preparation. Top-dressing with compost every couple of months adds nutrients and keeps your soil structure improving. Layer 1-2 inches of finished compost around the base of plants (not touching stems) and let it work its magic.
Mulching is essential. A 2-3 inch layer of mulch (straw, shredded leaves, or wood chips) keeps soil cooler, retains moisture, prevents weeds from germinating, and slowly decomposes to feed your soil. It’s like a blanket for your garden that also happens to be a long-term fertility investment.
Use organic fertilizers if needed. Healthy soil with regular compost additions might be all your plants need, but if growth seems slow, consider liquid fertilizers. Liquid kelp (seaweed extract) provides essential micronutrients and disease resistance. Liquid fish emulsion provides nitrogen for leafy growth. Coffee grounds and banana peel water are free homemade options. These work best when applied to soil rather than as foliar sprays.
Step Seven: Prevent Pests Without Chemicals
One of the biggest fears beginners have about organic gardening is pest management. The surprise is that chemical-free pest control actually works better long-term.
Healthy plants resist pests better. A plant growing in rich, living soil with adequate water is far less appealing to pests than a stressed plant. Before reaching for any treatment, make sure you’re doing the basics right: good soil, appropriate watering, and adequate sunlight.
Scout your plants regularly. Walk through your garden most days and look for pests. Hand-picking is remarkably effective—pluck off caterpillars, slugs, and beetles and dispose of them. It takes minutes and prevents infestations from starting.
Use companion planting strategically. Marigolds repel nematodes and aphids. Basil near tomatoes repels whiteflies and improves flavor. Nasturtiums trap cucumber beetles that would otherwise target zucchini. Herbs like dill attract beneficial parasitic wasps that prey on pest insects. This approach creates a naturally balanced ecosystem.
Healthy organic garden with companion planting and beneficial insects
Invite beneficial insects. Ladybugs, lacewings, parasitic wasps, and other beneficial insects are your allies. You attract them by allowing some “weedy” plants to flower around your garden edges and avoiding any pesticides (even organic ones) that might kill them.
Try natural sprays only if needed. Neem oil (cold-pressed, 100% concentration) works as a repellent and growth regulator for soft-bodied insects. Garlic spray deters many pests. Spinosad (derived from a soil bacterium) is deadly to insects but safe for mammals. Use these as last resorts only, not as regular preventatives.
Step Eight: Choose Organic Seeds and Starts
Where you source plants matters for maintaining organic integrity. Organic seeds are grown without synthetic pesticides or fertilizers and are never treated with fungicides. They’re usually more expensive than conventional seeds but support the organic system.
Heirloom seeds and open-pollinated varieties are great for organic gardeners because they’re adaptable and breed true, meaning you can save seeds for next year. This builds seed security and helps you develop plant varieties well-suited to your specific climate and conditions.
Certified organic seedlings and transplants from organic nurseries or seed companies prevent bringing chemical residues into your garden. Starting from seed is rewarding, but buying certified organic starts can simplify your first season and ensure success.
Frequently Asked Questions About Organic Gardening
Q: Do I need to spend a lot of money to start an organic garden?
A: Absolutely not. You can start with basic tools (a spade, rake, hoe, and watering can), free homemade compost, and inexpensive seeds. Even organic raised beds cost less than many people spend on a hobby. The investment pays for itself in fresh produce within the first season.
Q: Can I garden successfully in containers in my small yard?
A: Yes. Containers are perfect for small spaces, balconies, or patios. Even in a few large pots with quality potting soil, you can grow herbs, lettuce, radishes, peppers, and cherry tomatoes. The key is using proper potting mix (not garden soil) and not letting containers dry out completely.
Q: How long before I get my first harvest?
A: Radishes are ready in 25 days, lettuce in 30-45 days, spinach in 25-35 days, and herbs in 3-4 weeks. Tomatoes and peppers take 60-90 days. Many gardeners see their first modest harvests within 6-8 weeks of starting.
Q: What if I don’t have a lot of sunlight in my yard?
A: Grow shade-tolerant crops: leafy greens, spinach, lettuce, arugula, parsley, and mint all tolerate partial shade (3-4 hours direct sun). You can even create shade for crops like spinach during summer heat to prevent them bolting.
Q: How do I prevent overwatering and root rot?
A: The 2-inch soil test is your friend. Always check soil moisture before watering. If the top 2 inches feel moist, wait. Ensure all containers and raised beds have proper drainage holes. Use mulch to regulate moisture. In heavy clay soil or wet climates, raised beds are invaluable.
Q: Can I really control pests without chemicals?
A: Yes. Most pest problems vanish with healthy soil, regular scouting, hand-picking, companion planting, and benificial insects. Chemical-free gardens often become easier to manage than chemical-dependent ones because you’re working with nature instead of against it.
Q: When should I plant my garden?
A: This depends on your climate zone. Cool-season crops (lettuce, spinach, peas, broccoli) are planted in early spring (before the last frost) or late summer for fall harvest. Warm-season crops (tomatoes, peppers, beans, squash) go in after your last spring frost date when soil has warmed. Check your local frost dates online or ask at a local nursery.
Ready to start your organic gardening journey? Begin with one small bed or a few containers, choose crops you love to eat, invest in quality soil with plenty of compost, and be consistent with morning watering. You’ll be amazed at how quickly you go from absolute beginner to harvesting your own chemical-free food. Welcome to the world of organic gardening—your garden is waiting.
Asif Ali is a gardening blogger with over 2 years of experience writing about garden inspiration, eco-friendly gardening, and beautiful garden destinations. He focuses on practical, sustainable ideas that help beginners create inspiring gardens with ease.